How to Fix Common Car Paint Scratches

You pride yourself on doing everything you can to keep your car looking sharp. Finding a scratch can be mortifying after spending so much time on maintenance, but there’s no need to fear. You can fix scratches at home and prevent future damage to your car with a few simple steps.
What Causes Car Paint Scratches
Cars face cosmetic threats from every side. Simply parking in the wrong place or failing to pay attention while driving down a narrow street can result in unexpected damage. Knowing the most common causes of scratches helps with the repair process, making it easier to “diagnose” the problem and take the right steps to fix it.
Here’s what causes damage to your car most often:
- Low-hanging tree branches or shrubs
- Rocks and dirt kicked up as you drive
- Malicious keying or accidents when using your own keys
- Contact from glove buckles, scraper blades, brush bristles and brush handles when removing snow or ice
- Minor collisions and fender benders
- Misjudging distance when backing up near poles or walls
- People opening their doors into the side of your car
- Opening your door into the side of someone else’s car
- Errant shopping carts
- Kids playing or riding bikes near where you’re parked
- Being too close to the garage entrance when you back out
- Severe weather, such as sleet and hail
- Bird droppings left on the car’s surface for too long
Some of these sources of paint scratches can’t be avoided, especially if you live in an area with an unpredictable climate or you’re forced to park in a less-than-ideal spot.
Since you can’t keep your car totally free from blemishes, it’s important to know the proper way to approach DIY repairs so that you get the results you desire instead of making the problem worse.
Assessing the Damage
Before beginning repairs, inspect the entire surface of the vehicle. As distressing as this can be, it’s crucial in order to identify all the damaged areas and understand the extent of the maintenance job. It’s rare for a car to have just one scratch.
Taking pictures of the car while doing your assessment is useful, or you can make a note of each scratch you find. This ensures you don’t miss any spots when doing repairs and also helps you figure out what you’ll need for rubbing out or filling in the blemishes. At the very least, you’ll need sandpaper, rubbing compound and wax. You might also have to invest in repair putty, touch-up paint and clear coat.
The types and amounts of products needed depends on scratch depth. There are four “levels” of scratches:
- Clear coat scratches are minor and are the least visible
- Paint scratches are more obvious but still shallow enough for a simple repair job
- Primer scratches reveal a color other than the main paint job
- Scratches going down to the metal show up as deep blemishes
The deeper the scratch, the harder it is to fix on your own. Scratches going beyond the clear coat require more attention than surface scratches, and anywhere metal is showing will require the most work.
Fixing Scratched Car Paint
When the inevitable happens and scratches appear on your car, don’t waste time lamenting the loss of your perfect paint job. Take the energy you’d spend freaking out and channel it into a repair session. Your car’s beauty will be restored in no time.
- Choose Your Touch Up Method
The first thing to do after looking over your car is to decide how to address the damage. Scratches in the clear coat are the easiest to remove, requiring only sandpaper, rubbing compound and wax. If your paint is showing, the scratch reveals primer or you’re staring at bare metal, the job requires touch-up paint and quite a bit more patience.
All levels of scratches must be prepped the same way. Follow steps two and three to ready your car for touch up paint.
- Clean it Up
If you’re lucky and only find a couple of scratches, clean these areas just as you would if you were washing the car by hand. If the damage is more extensive, wash the entire car. Wait until the heat of the day has passed or park the car in the shade for best results. Use only soft, non-abrasive sponges or cloths, and dry the entire car thoroughly when you’re finished.
Washing removes excess dirt from the surface of the paint so that you don’t accidentally do more damage while performing repairs. It also ensures no dirt gets sealed into the areas on which you’re working, resulting in an uneven surface or a blemish with a worse appearance than the original scratch.
- Sand it Down
It can be nerve-wracking to touch your car with sandpaper, especially since you’re already upset about it being scratched, but it’s the best way to even out the damaged area and prep it for repair. Use sandpaper with a grit appropriate for the depth of the scratch. For deep scratches, you may want to start with 80 or 120. Shallow scratches can be addressed with 320, and 1,500 works for clear coat scratches.
Once you’ve gotten the scratch evened out as much as you can, finish with 2,000-grit sandpaper to smooth the surface. Use a clean microfiber towel to wipe away the debris and guarantee the area is completely clean. If necessary, wash and dry this part of the car again. If you’re fixing a clear coat scratch, move on to step four below. For deeper scratches, follow steps five through seven.
- Sand it Out
Like sandpaper, rubbing compound is abrasive and is used to grind down or even out scratched areas. It’s perfect for clear coat scratches because the scratch doesn’t go deep enough for the compound to damage the paint. This step also removes scuffs from sanding the scratch.
Rubbing compound can be applied by hand or with an electric buffer. If you have a buffer, attach a clean pad and place a small amount of rubbing compound on the damaged part of your car. Start buffing on a low speed to spread the compound out before increasing the speed and buffing it into the surface, applying firm pressure and using circular motions. Keep the buffer moving constantly to avoid scratching through the clear coat.
Repeat this buffing process for all minor scratches on the car before moving on to step seven.
- Fill it In
Glazing or spot putty is necessary to fill in deeper scratches and make the surface of the car look even. Choose a reliable brand, and get a squeegee for easy application. Use the squeegee to spread the putty over the prepared area, making sure to cover the entire scratch the first time. Attempting to apply a second coat could disrupt the smooth surface you’re trying to create.
Wet a soft cloth with a remover made to lift away excess putty. Gently wipe the area until putty covers only the scratch. After the area has dried completely, sand it down to remove any uneven spots in the putty. Wipe off the debris and clean the area using a clean microfiber cloth or towel. Do the same for the remainder of the deeper scratches you found when inspecting the vehicle.
- Touch it Up
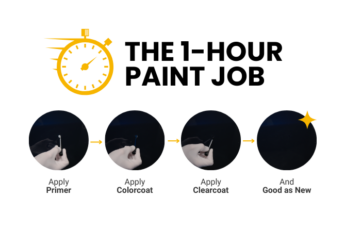
Now comes the step you’ve been waiting for. With the putty in place, you can finally say goodbye to the scratches and enjoy a blemish-free car again. If you haven’t already gotten a bottle of touch-up paint, it’s time to get a color matching the area you’re repairing.
Matching the color of your car is critical. You’ve done a lot of hard work up to this point with the goal of making your car look like new. Painting over a scratch with a color even just a bit “off” will make it stand out like a sore thumb. If you have to take extra time or spend a little more than you were expecting to create a custom color, it’s well worth the hassle.
With your paint in hand, use a fine-tipped brush to apply a line of paint in “dots” rather than sweeping strokes. This will make the finished surface look smooth and sleek. Cover the entire area until no putty is showing. Allow the first coat of paint to dry before applying a second coat. After the paint dries all the way, follow with some clear coat for added protection.
- Finish with Wax
To restore shine and preserve the paint in the area you just repaired, you need to apply a coat of wax. Clean up the spot first to remove any residual rubbing compound or debris which may have accumulated while the new paint was drying.
With a hand-held foam applicator or a foam pad attached to a buffer, apply a thin coat of carnauba wax. Use circular motions to spread the wax evenly. A second coat may be added if necessary. Once the wax has dried, use a clean microfiber cloth to remove it and polish the area for a “like new” shine.
When to Pay the Pros
Very deep scratches or areas where the car is beginning to rust may require professional attention to be restored to their original appearance. You can try to fix deep scratches on your own using the putty and paint method in steps five to seven, but if you’re not confident in your ability to make the scratch match the rest of the car, it’s time to find a good local body shop.
When you pay someone else to take care of your car’s blemishes, you get the benefit of experience and the assurance of knowing worse damage won’t result from a poor repair job. However, you could wind up spending anywhere between $50 and $500 on a job requiring only a few materials and very little time. Going to a dealer may set you back even more.
Paying a pro is a good investment when your car has multiple deep scratches, is suffering from spreading rust or has damage in addition to surface blemishes. Ask your mechanic to recommend a good body shop, or go online and read reviews of nearby options to find someone you can trust to take care of your vehicle.
Preventing Scratches on Your Car
Although you can’t expect to get through the entire life of your vehicle without any scratches, there are things you can do to protect the paint and save yourself the hassle of scratch repair:
- Use a car cover appropriate for where you park your car. Both indoor and outdoor covers are available to keep weather, sunlight and debris from harming the exterior. Indoor covers usually don’t have UV protection or a way to repel water and should only be used if you routinely park in a garage or are planning to put your car in storage for a period of time.
- Wash the car often by hand or in a touch-free car wash. When washing it yourself, choose a cleaning product specifically formulated for vehicle paint. Invest in a mitt or sponge for washing, and use microfiber cloths for drying. Apply a coat of wax once the car is dry to add another layer of protection.
- Change aggressive driving habits and remove distractions to minimize the chances of running into other vehicles or objects in the road.
- Choose your parking spaces carefully, avoiding tight spots whenever possible.
- Have a clear protective film installed in the areas most vulnerable to damage or over the entire surface of the car.
- Never set anything on the car. Even if it’s something soft or smooth and you don’t think it will cause damage, using the car’s surface as a shelf is asking for trouble.
These small investments and simple changes of habit don’t require a lot of time or money. The more you can do to keep your car safe, the lower the risk of new scratches occurring.
When you catch scratches early and fix them as soon as possible, you can prevent further damage to your car. Take added precautions to avoid future problems, and you’ll not only preserve the paint but also save money on maintenance and ensure your car stays looking great for years.

 Cart
Cart
 Help Desk


